
Survival School – Quick Tips and Tricks
Summary
 The internet is chalk-full of information to help us survive after any cataclysmic event—natural and manmade. You can lose yourself for days trying to gather everything by yourself. Here’s a handful of advice we found online to help you once the zombies rise and force us to abandon our homes.
The internet is chalk-full of information to help us survive after any cataclysmic event—natural and manmade. You can lose yourself for days trying to gather everything by yourself. We’ve done some of the work for you, brave brigadiers. Below you’ll find a handful of advice we found online to help you once the zombies rise and force us to abandon our homes.
Light Sources
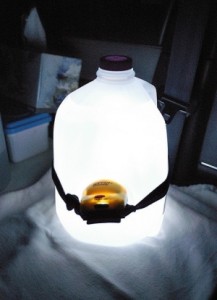
Fill a gallon jug with water. Strap a headlamp or flashlight onto the jug, with the light facing inward. This will illuminate a small space, like a tent, with soft light. No glares and no bright beams which could attract predators to your camp.
Fill a clear soda/water bottle with half water and half bleach. Set the bottle into the roof of any shack or improvised shelter with a sturdy roof. The mixture will reflect sunlight, creating approximately the same wattage as a 55-watt light bulb. Note: This is a daytime-only solution.
Crayons! We haven’t personally tested this trick yet, but if you need a quick emergency light source, light a crayon. It should provide the same amount of light as a small candle for about 30 minutes. Note: Not ideal for handling, the wax will drip. Make sure you have a sturdy, clutter-free spot to set the lit crayon.
Fire Starters
There are a lot of options for homemade fire starters. We chose two that required very little work and used items which would normally just be thrown away. For both, set them with the kindling at the base of your fire and carefully light the edge.
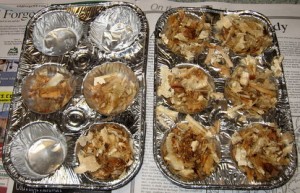
- Muffin Fire Starter
Needed:
Muffin Tin
Paper muffin wrappers
Dryer lint
Melted wax (crayons work!)
Set the paper muffin wrappers in the muffin tin. Fill the bottom of each wrapper with a wad of dryer lint. Pour the wax over the lint, leaving about a quarter of an inch of room at the top so you have a place to light the fire starter. Allow to cool thoroughly before packing.
An alternative method utilizes an empty cardboard egg carton. Put in the lint and wax as described above. When the wax has set, cut the egg carton apart.
- Tube Fire Starters
Needed:
Cardboard toilet paper tubes
Dryer lint
Newspaper
String (optional)
Pack dryer lint tightly into the toilet paper tube. Wrap the filled tubes with newspaper. Tuck the ends of the newspaper into the tube, or tie off the ends with string—either way works, so long as you trap the lint so it doesn’t fall out in your go bag.
Containing the little things
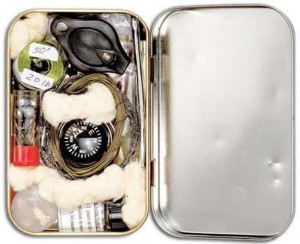
Don’t throw out those Altoids (or similarly-sized) tins! They’re incredibly helpful when packing your go bag. Here’s some ideas:
Sewing kit –Pack with sewing needles, straight pins, safety pins, tiny spools of common-colored thread, buttons, small scissors, seam ripper, and anything else you need to mend or make your own clothing.
Fire lighting kit – Pack with matches, a lighter, flint, and a small wad of dryer lint or some other easy-to-light material. Affix a piece of sandpaper to the inside of the tin’s lid to light the matches.
Individual first aid kit – Pack with bandages, alcohol wipes, tweezers, packets of antibiotic ointment, Tylenol, aspirin, Benadryl, other personal medications. Note: Ladies, don’t forget to pack a separate container (a coffee can or plastic baby wipe box) with feminine hygiene items.
Jewelry box – Keep your sentimental jewelry items safe. Wearing a wedding ring while on the run could lead to problems. Any blow to the hand could cause your fingers to swell.
Gaming kit – Pack with a pack of cards, dice, Yahtzee scorecards, a small pencil, and any other small game items you can think of to entertain yourself.
Soap holder –Soap will be at a premium during the Z-poc. Don’t waste it! Store your used soap in a tin to keep it clean.
Don’t Leave Home Without it
Pill organizers aren’t just for keeping track of your weekly medication needs. Grab a couple extras to add to your go bag.
Spice rack –Cooking in the wild will likely lend to a lot of bland, boring meals. But not if you take along a miniature spice rack packed with your favorites. Be sure to label each compartment. You wouldn’t want to confuse paprika with cayenne pepper.
Seeds – Who knows how long we’ll have to fend for ourselves without the aid of grocery stores or farmer’s markets? Pack some easy-to-grow vegetable and fruit seeds in your go bag. Once you find a place to settle down for a little while, plant a small garden. Check your area for what produce items grow the fastest and easiest.
Old t-shirts
When you pack your kitchen supplies, toss in a few old or over-sized t-shirts. They have many possible uses, a few of which we’ve included below:
Rags – Cut the shirts into smaller pieces to use for wash cloths, dish washing cloths, and clean-up rags.
Bandages – Cut shirts into long strips, about 2-3 inches wide. Boil them in water, with a tablespoon (or more, depending on the quality of the water) of bleach and hang to dry somewhere they won’t get dirty. Makes great compression bandages to slow bleeding. Also can be used as a wrap to brace sprained joints.
Small hanging bags – With a minimal amount of sewing, which can be done by hand, you can turn a t-shirt into a bag.
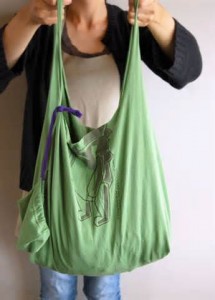
- Needed:
A large t-shirt
Scissors
Needle and thread
Straight pins
Felt or permanent marker
Lay the shirt out on a flat surface. Using the side of the shirt as the bottom edge of the bag-to-be, trace out the shape of a purse, with a handle on the top. Pin both sides of the t-shirt together with straight pins. Cut out the bag, leaving the bottom of the bag intact (don’t cut down the side of the shirt, it provide a solid bottom for your bag). Stitch the sides of the bag closed. Leave the top open. Cut out D-shapes to create the handles. Note: if you wish to use the bag to store fruits or vegetables, or to use as a hanging sack to dry dishes, cut tiny holes in the solid sides of the bag—not too many, just enough to allow airflow.
By RC Murphy