Given the amount of undead action on our plates, and the ferocity with which we love the shows, it’s only right to have a survival plan in place to make it through those rough episodes.
Note: this is not to replace your current go bags, escape routes, or safe haven plans.
Prepare your viewing room.
Remove any and all breakable items from the room. There may be random bouts of flailing or flinging things at the television screen. We don’t want to ruin anything important.
Ensure there’s a clear path to the bathroom. You’ve only got a couple minutes during commercial breaks to answer nature’s call. Don’t waste a second tripping over shoes or toys. Miss one second of the action and you may miss saying goodbye to a favorite character.
Build yourself a squishy fort. Load it with pillows and blankets. Pillows come in handy when you need to hug a character, yet can’t. Blankets provide the perfect Gore Shield, lest the blood and guts on screen become too much to handle.
Kleenex. Trash can. Need we say more?
Secure your noise-sensitive pets in a quiet room with their favorite toys and a goody or two. Some animals don’t react well when their owners randomly shout at the television.
Keep a roll of duct tape on the coffee table. Just in case you have that one friend over. You know, the one who stands and paces while yelling at the TV.
Refreshments. You need to keep your strength up.
The ideal foods to serve should be cold or room temperature. Soft, yet not too messy. This is in case you drop the food during a tense moment. Hot foods will burn your lap. Messy foods stain clothes/carpets/furniture. Hard foods, when thrown, have the potential to break glass. Like a TV.
Beverages should be cold to prevent burns. Preferably clear. Again, to prevent personal harm or property damage if spills happen in the heat of the moment.
Plastic or paper serving dishes, plates, and cups.
Avoid foods and drinks which resemble blood, internal organs, or raw meat if you have a weak stomach for gore.
Drink plenty of water. Exciting shows raise your heartrate and blood pressure—just like jogging*. Maintaining adequate hydration will keep you comfortable. (*Do not use TDW or FtWD as a replacement for your regular exercise program.)
Play nice with others.
Call dibs on bathroom use to avoid a stampede when commercial breaks hit.
Warn your neighbors if you feel you will yell at the show. This is especially important for apartment dwellers, those with noise-sensitive roommates, or folks living in otherwise quiet neighborhoods.
Do not, under any circumstance, discuss potential spoilers while the show is airing. Your viewing party pals may enjoy being surprised. Don’t ruin it for them.
Keep the fish in cold water until you’re ready to clean them. Fish spoils rapidly after death. Plan to catch, clean, and cook the fish within a two-hour span or less.
Prepare your cleaning table. Cover the table with newspaper. Set out everything you’ll need. Nothing is worse than getting fish goo all over your hands, then stopping to fetch the knife you forgot in the bottom of your go bag. Cleaning fish is messy. It’s best you don’t do this in camp, lest the residual mess you can’t clean attract wildlife.
Scaling the fish.
Grab your first fish and plop it on the cleaning table—keep the rest in cold water until it’s their turn. Hold the fish down by its head. Starting at the tail, use the butter knife or fish scaler to scrape the scales, working toward the head. Short, medium pressure strokes work best. Don’t press too hard, you’ll damage the flesh. Make sure to remove all the scales around the fins and gills.
Rinse the fish. Make sure all the loose scales are rinsed off. If you have more fish to work on, store the little fellow in clean water.
The First Cut:
Now is not the moment to be squeamish. Set the scaled fish down on the prep table. Hold it down firmly by the head, as before. Using the sharp knife, insert the blade tip into the fish’s anus—that’s down near the tail on the underside of the fish. Note: If you have a larger fish—one larger than a frying pan’s diameter—flip it onto its back for easier cutting.
Draw the knife along the fish’s belly, going from the tail toward the gills. Put the knife aside.
Now for the messy part.
Stick your fingers into the fish and scoop out everything inside. Dump the innards into the trash bowl. Note: Do not dispose of the innards near camp. All camp garbage should be stored elsewhere so it doesn’t attract wildlife.
Rinse the fish. Make sure to give it a good wash inside to remove anything which could potentially make you sick.
Off with its head! Some people are opposed to eating food that looks at them. If you want to, cut the head off behind the gills and give it another quick rinse.
Store the clean fish in cold, clean water until you’re ready to cook it. We suggest using Commander in Chief Juliette Terzieff’s quick and easy recipe.
The best survival plan begins long before you and your family comes face-to-gnashing-teeth with danger. Figuring out where you’ll live now that home-sweet-home is covered in zombie drool should be high on the priority list. For some, it’s not ideal to leave their home due to disability, young children and infants, elderly parents, etc. Others already have their evacuation plans in hand with every route mapped out so they hopefully land somewhere z-free with a place to settle down. For the record, we don’t suggest an old prison, it doesn’t seem to end well.
For any location you choose to settle down, there are a few basic things to do which will give you a little more time for fight or flight if the zombies find you.
Cover every single window. Ditto with doors, leaving two with a relatively easy way to exit just in case. We suggest using corrugated metal, 5/8″ exterior grade plywood, or marine plywood. Screwing the boards in place will make them stronger. You may want to pack a battery-powered drill in your supplies cache. If that’s not doable, hammer and long nails will work. Place the boards on the outside of the house—it’ll prevent a horde from using sheer weight to push them free. Don’t forget to secure the garage door! You’ll want the extra safe space, anyway.
Grab anything outside your safe house which can be used as a battering ram and bring it inside—trash cans, barbeque, lawn furniture, gardening equipment, etc. We’re not saying the zombies will be brighter than the dirt on their feet, but one must take into account possible human invasion as well. Particularly people who have grown desperate and angry over failure to secure a place of their own.
Take the time to do a little yardwork. Clearing away grass, shrubs, and trees within a 10-yard radius around the house will prevent accidental fires. The cleared wood (if dry, or set aside to dry) will come in handy, anyway. Plus, if you get rid of the lawn, there’s not much holding you back from finally using that flamethrower you picked up on a whim. I kid. Mostly.
Bring all of your supplies inside the safe house—water, tools, food, clothing lines, wash buckets, firewood, etc. If you cannot secure your vehicle(s) inside a connected garage, drain the gas and bring it inside, as well.
It may not look like much, but it could be home sweet home with the right planning and preparation.
Here are a few health safety tips to remember about your newly secured safe house:
Establish a clean room for cooking and food storage. In another room, create a clean place to tend to medical emergencies. I’d highly suggest using vinegar to clean these rooms, not bleach. With low water supplies, you may not be able to rinse away bleach to safe-to-handle levels. However, keep bleach on-hand to purify washing water.
Do not use a barbecue indoors! If you are without a propane stove, plan to create a secure, well-ventilated patio outside one of your two emergency exit doors. As a bonus, this can act as a staging area if you must evacuate from the safe house.
Keep the generator outside. Carbon monoxide poisoning isn’t pretty. This is the only survival item you must leave outside. Hey, if you build that patio, it can go there, as well.
Do not use kerosene for your indoor lamps. It smells awful and the impurities aren’t good for your lungs. Opt for lamp oil and make sure to read the label to see if the brand is safe for indoor use.
Keep all flames away from the secured windows/doors. If there is a breach, the flame will likely fall over. Don’t make the zombies’ job easier by giving them a way to burn you out of your safe house.
Signs of carbon monoxide poisoning: Nausea, dizziness, weakness, confusion, disorientation, vomiting, and sleepiness.
Cramming supplies into your go bag isn’t enough. You need skills to back them up. In the age of microwave everything, fast food, and premade box meals, cooking is quickly becoming a lost art form for newer generations. If given a fire, a pot, and whatever supplies you can carry on your back, could you make a meal? Probably not a very tasty one the first time around. Good thing the zombies are moving slow. We have time before the apocalypse to learn some basic recipes, which can be tweaked to utilize whatever you scavenge.
Soup is always a crowd favorite and typically easy to make. Below is a quick and easy barley and bean soup.
Ingredients:
1 cup barley
1 1/2 – 2 cups White Beans (Rinsed and soaked in purified water, or use two cans.)
6 cups Chicken or Vegetable Broth
Chop the following into 1/4 inch chunks:
2 Carrots
1 Zucchini
3 Stalks of Celery
2 Medium-Sized Potatoes, skin on
1 Small Yellow Onion
Dump everything in a pot and season with:
Salt (To taste.)
Pepper (To taste.)
1/8 tsp Cayenne Pepper (More or less, if you like.)
1 tsp Ground Sage
1/2 tsp Garlic Powder
1 tbsp Parsley
If everything isn’t covered by liquid, add more broth or purified water. Let it cook over the fire, stirring occasionally. Total cooking time will be about 90 minutes after the liquid begins to boil.
At some point after the beans are cooked through, toss a can of diced tomatoes in the mix. Also at that point, taste and add more seasoning as desired.
No fancy toppings for this soup. Just shove it in a bowl and eat. This recipe should make about 8 servings, depending on the size of the vegetables.
Tip: When fresh vegetables are on sale, grab a few extra to chop and freeze. This way when you are forced to flee, you’ll have the base for numerous healthy meals that’ll keep you moving.
Cornbread would go good with this soup. We’ll attempt that recipe next time around.
Comfort. That concept is the antithesis of what it means to survive in the zombie apocalypse. For the most part, we’re prepared to leave our cozy homes with their soft mattresses, refrigerators, filtered water, and indoor plumbing to chance it on the road in order to stay one step ahead of the undead menace. But without taking a couple moments to pamper yourself, life will start to suck and thoughts will wander. What if I went back home? Surely the zombies skipped my house and moved out of the city.
Yeah, and while they were there, they gave the living room a fresh coat of pain and reupholstered the couch your cats scratched up. Instead of putting yourself in danger’s path with daydreams of normalcy, we’ve compiled a list of things you can do for your road-weary body.
Take care of your transportation: Better get used to hoofing it around the country once gasoline and diesel supplies run out. Walking takes forever, but any forward progress is good when the enemy is shambling in your wake.
Invest in good insoles for your shoes/boots. Something graded for a ton of walking or high-impact work insoles.
Clean socks. If there’s one thing you over pack in your go bag, make it socks. A quick change will give your tootsies a burst of energy—caffeine for your feet.
Freedom. Feet trapped in shoes for too long stay damp and court fungus. Take some time to give them a wash and let them dry out every day. As a bonus treat, give yourself a massage with a dollop of minty lotion.
Soothing sore spots: Not only will fighting the undead take a toll on your muscles, but so will everyday chores—made much more difficult by the lack of modern conveniences. Spas will be seriously lacking, as will a bathtub to soak in, but heat a cold applied to appropriate muscles will help.
Rice heating pads are wonderful and ridiculously easy. Take a tube sock, fill it with dried long grain rice, and warm it. Dried beans would work, as well. Warming will be tricky without a microwave. Put a brick-sized rock near your campfire for about half an hour. Pull it away from the fire with tongs or a pot holder. Set the rice-filled sock on top and flip it over every minute or so until it feels like the rice is heated through. Apply the heating pad to any sore muscles
Ice packs come in handy, too. They’re also pretty easy to make. However, you’ll need access to an ice chest still filled with ice to refreeze these packs once you’re away from home:
Method #1: Alcohol/Water Ice Pack
You’ll need:
2 cups water
1 cup rubbing alcohol
2 zip-top bags (quart or gallon)
Dump the water and alcohol in the first bag. Seal it, pressing out as much air as possible. Secure the filled bag in the second—just in case there’s leakage when it defrosts. Freeze the mixture for about 12 hours before the first use. It’ll be squishy, but that helps it mold to your body better.
Method #2: 1-Ingredient Gel Packs
You’ll need:
Corn syrup or dish soap
2 zip-top bags
Pour the dish soap or corn syrup into the first bag. Secure the filled bag in the second. Freeze for about 12 hours. These may freeze harder than the above method, but still work well.
Pucker up: Being out in the elements won’t do pretty things to your lips. Wind, sun, and inevitable mild dehydration will chap your lips, possibly to the point where they’ll bleed. Keep Chapstick handy. Or make a quick and easy lip balm from the recipes below.
Method #1: Mint and Honey Lip Balm
You’ll need:
1 teaspoon petroleum jelly (or Un-Petroleum Jelly)
peppermint extract
one teaspoon honey
small container with a lid.
Heat the petroleum jelly for 30 seconds in the microwave. Mix in 3 drops of peppermint extract and the honey. Put the mixture into the container. Let the lip balm set overnight without the lid. Once the mixture is set, pop the lid on and you’re good to go.
Method #2: Drink Mix Lip Balm
You’ll need:
A small container
enough petroleum jelly (or Un-Petroleum Jelly) to almost fill the container
a packet of flavored drink mix (water bottle add-ins like Kool-Aid or Crystal Light, try to avoid any with aspartame).
Mix the drink mix and petroleum jelly until you reach a color/flavor that appeals to you. Spoon it into the container and close the lid. Done!
Biting pests: We’ve covered bug repellents before, but I’ve discovered a new, super-strong recipe to share. Don’t forget, in a pinch you can simply rub fresh peppermint, spearmint, catnip, pennyroyal, citronella, lemongrass, basil, or lavender on your clothes for moderate insect repelling powers.
New recipe:Four Thieves Vinegar
You’ll need:
32 ounce bottle of Apple Cider Vinegar
2 tablespoons each of dried Sage, Rosemary, Lavender, Thyme and Mint
a quart size glass jar with airtight lid.
Pour the vinegar and dried herbs into the jar. Seal tightly and set it on the kitchen counter near the coffee pot (or a place you see every day). Shake the jar vigorously every day. Continue for 2-3 weeks. After 2-3 weeks, strain out the herbs and store the vinegar in the fridge. To use on skin, dilute with a 50/50 mix of vinegar and water in a spray bottle.
There you have it, a few ways to make life running from the undead moderately comfortable, or at least tolerable until the spas open up again
Grandparents the world ’round loved to spout that phrase for generations who grew up heavily reliant on television for their entertainment. Gone are the days where kids go outside as option numero uno to battle the dreaded boredom monster. Of course, most adults shun the great outdoors, as well. Why not? There’s the dreaded sun beating down, giving us an unhealthy dose of UV rays. Not to mention bugs the size of a Chihuahua. But how are we supposed to learn important survival skills without first-hand experience in the wild? Easy. Television, of course.
Post-apocalyptic shows are all the rage currently. Which says a lot about how much faith writers have in the survival of the human race. Not all the shows below use zombies as the catalyst for an apocalyptic scenario, but there’s still plenty to learn from each.
The Walking Dead:
Obviously, we’d start with our friends over at TWD for this list.
The show does a bang-up job of demonstrating a nomadic lifestyle for the main cast. How it is nearly impossible to settle in one place with such an unpredictable enemy—both in the walkers and humans who’ve lost grip of their moral leashes. Rick and company have perfected the idea of traveling light, keeping an eye out for possible resupply stops, and only carrying what one can without sacrificing speed. The show also addresses what happens when there is no law, no authority to put their foot down and make people behave civilly. Not everyone turns into a greedy, self-centered jerk. But enough have to speak volumes about where humanities priorities lie. If you don’t have the sheer strength to take what you want, you can go without.
In the Flesh:
The BBC’s newest breakout series takes place after the war with the undead is over and a cure of sorts has been found to return conscious thought to those who’ve risen from their graves.
While there’s not a lot of raw survival skills at work, it is a good show to look at and understand that once the war is over, there’s still many, many small battles left to fight. Post-Traumatic Stress Disorder is a huge part of what the main characters go through. Some were forced to kill loved ones. Others volunteered to fight the undead, not realizing how hard it’d be to not only pull the trigger that first time, but stop killing when the dust settled. Small minds and strict morals rule in the village of Roarton, almost to the point of insanity. It’s a backlash, a way to get a stranglehold on the chaos they lived in for so long. Think of the show as a “How not to act” once the coast is clear and you can settle into some semblance of a normal life again.
Falling Skies:
TNT stepped up to the post-apocalyptic plate with their take on what happens after creatures from another planet decide to make home here on Earth.
The first season picks up the story about six months after the invasion. Mankind as a whole are on the run, hunted by vicious beings called Skitters and their ruthless Overlords. Early on, there is a handful of military on hand to lead and protect civilians. As the show progresses and the Skitters force the survivors to split up and hit the road, those numbers dwindle to nearly nothing. That means Everyday Joes are required to step up and learn what it takes to live on to see tomorrow. The show is packed with survival goodies ranging from locating safe resupply stops to improvised explosives and how to secure a safe haven from attack.
Defiance and Dominion:
Not one to be left out of the loop, Syfy unleashed a pair of post-apocalypse shows in the last couple years. Both shows focus on mankind rebuilding civilization after an advanced being wipes out a huge portion of the population. Defiance takes place in a world that’s nearly been made inhabitable for humans thanks to the “Arkfall,” which rained alien technology down on Earth and accidentally terra-formed portions the planet. The terra-forming killed many native species of animals and plants, or turned them into something humans cannot eat. Huge stretches of the United States are unpopulated and too dangerous to live in for long periods of time. What cities were salvaged, like St. Louis, hardly resemble huge, sprawling modern cities. Instead they’re little more than a haphazardly thrown together mining town, with housing and buildings made from scrap wood and cargo containers. They’re rebuilding from the ground up, everything from buildings to the laws governing new-comers and humans alike.
Dominion likewise took a well-known city to use as its home base. The Las Vegas seen on the show barely resembles what we know of it today. Vega, the name given to the city by those hiding behind its tall walls, is designed to be a fortress to keep out humans who’ve been possessed by genocidal angels lead by the darkly charming Gabriel. While the buildings are still intact in Vega, there’s a huge food and water shortage. They’re camped in the middle of a desert. Unable to farm the land outside the city’s walls. Yet somehow they make do and almost lead normal lives. Isn’t that the goal of every person after the apocalypse, to find normalcy again?
Under the Dome:
On this CSB drama, the apocalypse is contained to the city of Chester’s Mill when a giant invisible dome is plunked over the town like Tupperware over a spider.
The problems plaguing the townsfolk don’t come from an outside source. It’s all internal strife, greed, and struggle to figure out not only what’s going on with the dome, but how they’re going to survive an unknown amount of time with what food and water are within the dome. Several plague-like scenarios threaten the food supply—ravenous caterpillars, acidic red rain, dust storms, and a burst pipe that drains the water tower. While battling the city’s need for supplies, people are fighting on another front—to retain some semblance of law and order. Difficult to do when the people at the top of the food chain are corrupt and general panic brings out the bad in everyone or gives others the impression they can force their questionable morals on the public. This is a good place to learn how to pool resources for the long haul.
Firefly:
At least the other shows don’t have it as bad as the guys on Firefly.
The Earth was crowded, too crowded, so some folks took it upon themselves to venture into space, finding planets that could be terra-formed to Earth-like conditions. Sometimes it worked, other times it didn’t. Most of the time, the planet’s occupants are too poor to bring in what they need to farm the land. Enter our intrepid heroes. Okay, smugglers. Thieves. Whatever. Malcom Reynolds and his crew are the epitome of the post-apocalyptic attitude. When the mud hits the fan, you keep moving. And occasionally, moving forward and surviving call for a different mentality.
Or as Jayne would say, “Shiny! Let’s be bad guys.”
Sometimes, sneaking into The Oracle‘s office yields gems of knowledge I can pass onto you, brave ZSC brigadiers. Other times, I’m chased out by a snarling beast that’s hitched a ride back to the Command Center during LK’s latest trip out to test her misbehaving flux capacitor.
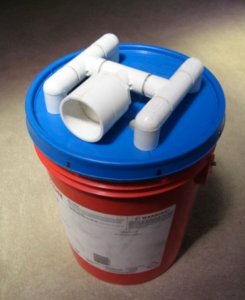
Today’s Survival School lesson is more of a science experiment—how to safely create your own hydroelectric generator. The plans we’ve located are designed to be easily made by someone with a little skill and appropriate tools. All the supplies, mostly PVC pipe and a 5 gallon plastic bucket, are reasonably priced. The idea behind the generator’s design is to provide small-scale clean energy for developing countries at a moderate cost. Everything needed to make the generator is in the PDF file from engineeringforachange.org, including a full supply list, tools needed, and a step-by-step guide with color photos.
How much power can it provide? Well, you won’t be running an air conditioner off a plastic barrel, that’s for sure. However, with the right water flow, this generator can hit about 90 watts—enough to power 80 1-watt LED lights, or 3 30W UV water treatment systems.
I’ll be honest, my skill is with words, not engineering. But this generator—or any similar design—seems like it’d come in handy if the apocalypse does indeed take out the electric grid or we’re forced to take refuge in the wild for long. It’d certainly save us from using all our fuel on gas-powered generators
Hate to break it to you, brigadiers, but once the undead shamble from their graves, there’s a pretty good chance we won’t have the technology most of us rely on every day to keep entertained. Say goodbye to your tablet games once the battery dies, same with cell phones and laptops. Television, internet, anything requiring power will become rather expensive dust catchers. We’re breaking out in hives thinking about it. Boredom is a slippery slope. Most of our energy will be spent staying alive. But what happens once we settle down for a few days to recuperate? One can only patch so many clothes, do so much laundry, and gather supplies from nearby sources before going batty.
Before you take flight, here’s a few things you can pack or gather in order to keep your mind busy.
Dollar Store Games – The majority of these games are designed to entertain kids while in the car. They’re compact. Simplistic. The pieces may be a bit small for younger children or adults who’re a bit clumsy. But, for a couple bucks, you can grab a handful of games that’ll pass the hours.
DIY Travel Games – Break out those mint tins we told you about a while back. With some paper, markers, and small magnets, you can make your own pocket-sized 4-in-1 game—chess, checkers, backgammon, and tic-tac-toe. Finding directions online is pretty simple. Or wing it. You can also get creative and make a miniature Scrabble game the same way.
Playing Cards – There’s about a billion card games you can play alone or with a group. If everyone packs a deck, you should be good to go with any game you can think up. Cards are also a good way to fairly divvy up camp chores, guard schedules, leave coded messages in camp, etc.
Dice – Like playing cards, there’s numerous dice games out in the world with endless variables to prevent monotony. Find a pocket book with game ideas to keep in your go bag.
Written Games – Pack a notepad/pen or a small dry-erase board to make your own Mad Libs, Hangman, cross-words, trivia, etc.
Good Ol’ Dirt and Rocks – No, we haven’t gone totally insane. Yet. There’s a few games that require little in the way of equipment. A stick in the dirt can draw just the same as a notepad and pen for written games. You can also strike up a game of Mancala, or any game that requires only spaces on a board (the ground) and markers (rocks).
We’ve covered food quite a bit. Understandably. While a human can survive for three weeks without food, it isn’t pleasant. Starvation means no fuel to make our bodies move, and we’re all about mobility here at the ZSC. Staying put, unable to defend yourself is the very thing we’ve been preparing our brigadiers against. A stationary target becomes zombie chow pretty quick. But how are we supposed to maintain a balanced diet on the run? You won’t. However, if you focus on finding steady sources for protein, keeping one step ahead of the undead will be much easier.
The CDC recommends teens and older eat about 50 grams of protein a day. It may sound like a lot, but not when you consider that a single fillet of striped bass contains a whopping 28 grams of protein. Just remember, the more active you are, the more protein you’ll need to keep your muscles going. Despite running for your lives, you’ll need to self-check your health anytime you stop to rest.
–Are you overly exhausted despite adequate sleep? Lethargy and the overwhelming urge to sleep is a huge red flag for protein deficiency. If you’re having trouble finding motivation or focus to do anything or curling up for an afternoon nap when you’re normally not a nap person, time to take a look at what you’ve eaten the last few days.
–Feeling weak as a newborn lamb? Muscle weakness is one of the first signs that you need to up your protein intake. Look for trembling muscles, wobbly knees, along with trouble focusing your eyes.
–Not filling out your clothes the same anymore? It’s an old wives tale that says a starving body will go for the fat first. Bodies need protein to keep internal organs going. They’ll start cannibalizing healthy muscle tissue in order to get what it needs. Sure, you’ll look like you lost weight, but you won’t be able to swing a q-tip, let alone an ax at a zombie.
–That cut on your arm refusing to heal? Slow healing goes along with the bit up above. Your body will focus on keeping your internal organs going, only sending excess protein to help rebuild damaged tissue such as wounds and sprains. If you have a fellow survivor who is injured, don’t think their lack of mobility means they need to cut back on food.
–Bald isn’t your hairstyle of choice? Hair loss and brittle finger/toe nails happens for the same reasons stated above—your body is conserving protein and energy for vital functions.
Where can you find protein? Below are two lists, arranged from the highest amount of protein per serving size on down.
Protein sources to pack: Dry whole milk, pork chop, chicken thigh, chicken breast, turkey breast, edamame, non-fat dry milk, steak, chicken leg, ham, kidney beans, white beans, lima beans, black beans, fava beans, mung beans, canned tuna, non-fat/low fat cheese, pumpkin seeds, peanuts, beef jerky, almonds, pistachios, sunflower seeds, tofu.
Protein sources to find in the wild: Rainbow trout, beaver, striped bass, bear, catfish, deer, muskrat, rabbit, squirrel, opossum, boar, horse, goat, raccoon, freshwater bass.
The wild resources are numerous and vary by location. Best bet is to fish for your supper. One fillet of rainbow trout is well over half of what you need per day at 33 grams of protein.
A quick note for those thinking, “Why don’t I just pack a bunch of protein bars?” While that’d seem like a good idea, it isn’t. Most of the popular protein bars are a bunch of sugar and fat wrapped around a minimal amount of protein. The kick you feel from eating one isn’t from the fuel you need, but from the junk they used as filler. During my research, I found one protein bar that wasn’t full of fat and sugar. For the 20 grams of protein it’d give you, the cost (over $2 per bar) isn’t worth it. You’d get more from buying $2 worth of kidney beans.
You’ve got your shopping list. Better make sure your emergency food supplies include most of the dry ingredients listed above. They’ll keep you going long enough to establish camp and hunt.
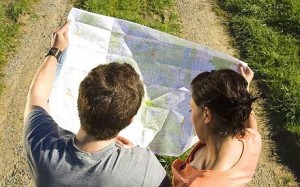
Ideally, when plotting your escape routes it’s best to remain on the road. Venturing into the landscape is dangerous, full of unknown dangers from more than just the undead. In reality, you’ll need resources like flowing water, edible vegetation, and game animals who shy away from busy roads. Once away from the beaten path, it’s easy to get turned around and lose sight of your escape route. Relying on GPS during the apocalypse (or heck, even driving through Texas today) isn’t a good plan. We have no clue how long technology will continue to run post undead uprising. Now it the time to start honing your navigation skills. Below are some tips and tricks to keep you from relying on breadcrumbs to find your way.
Learn How to Read a Map
We’re all about being prepared, which means you should know well in advance what escape routes you plan to take.
Make sure you have a map, or numerous maps, in your go bag covering the locations you must travel through. Take a little time to study them. Find roads that take you near moving water sources so you can top up on fresh water and have a chance to bathe, catch fish, and gather edible vegetation growing nearby.
An easy map-reading guide:
Check the map key. It’ll tell you what various symbols mean. Important for navigating via landmarks or finding towns/cities large enough to safely resupply.
Learn how to gauge distance using the map scale. For 1:24,000 scale maps, one inch equals 2,000 feet. For 1:25,000 maps, 5 centimeters equals 1,250 meters. Most maps are drawn on grids to help facilitate calculations.
For the most part, maps are color coded the same: Black – man-made structures, roads, train tracks, pipelines, and property boundaries. Brown – topographic features such as contour lines. Green – Vegetation features, like forests. Blue – Rivers, lakes, streams, swamps, water reserves. Red: Main roads, highways, and sometimes tunnels or survey lines.
Use Major Landmarks
Once you’re on the road, keep going for as long as possible before making a pit stop, especially if the area you’re traveling through is mostly wilderness. It’s no good putting yourself in unnecessary danger for a drink of water when you’ve got a full supply in the car. But once supplies start running low or you can’t stand the body odor of your traveling companions, take a few vital steps before heading into the woods:
Find a spot in the road nearest to the body of water you seek.
Double check with your map to make sure the water source is a river, large stream, or lake. Swamps and the like are stagnant and chock-full of harmful bacteria that won’t boil out using emergency purification techniques.
Locate at least two major landmarks on the map, and then make visual confirmation from the point where you leave your car. This gives your brain something physical to work from while calculating which direction to walk on your return trip.
Note which direction the sun is moving.
Calculating Distance
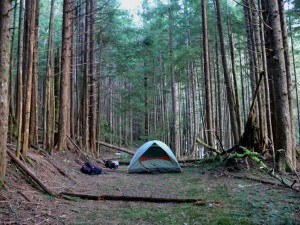
Using the map scale, judge how far your trip will take you from the road. Keep hikes short. Not only will this reduce exposure to danger, but it’ll use less energy to take a 30 minute hike compared to a 2 hour hike. Less energy means fewer calories burned. It’ll make your food supplies last longer. Also be mindful of the time of day. Schedule your trip so you have ample time to return before dark. Improvised camping is dangerous. You don’t know what native beasts lurk in the woods. Without proper shelter, you could wake up cuddling a snake. Or not wake up at all in the belly of a desperate, hungry mountain lion.
Map and Compass Work
The easiest way to navigate new territory is with a map and compass to keep yourself oriented, even after scouting a few major landmarks. I won’t pretend to be an expert here. Heck, I get lost in the mall all the time. But that’s what the internet is for. Here’s a link to an excerpt from The Backpackers Field Manual by Rick Curtis that covers the basics of map and compass work.
Navigating without a compass
While we don’t advise leaving your compass at home once you’re on the run from the undead, accidents happen. Things get lost or broken in the shuffle. The dog ate your compass. Whatever. So on the off-chance you’re stuck without, here’s a couple simple ways to find north so you aren’t a lost babe in the woods, Hansel.
Never Eat Soggy Waffles. This is a mnemonic, a cheeky phrase used to memorize North, East, South, and West going clockwise. So once you’re facing North, East is to your right, South behind you, and West to your left.
Watch the sun: It rises in the East and sets to the West. If you don’t have time to watch the sun, there’s a quick-ish method to determine which way it’s moving:
Find a tall stick and set it in the ground.
Mark the top of the stick’s shadow with a rock (or whatever’s handy).
Wait 15 minutes.
Now mark the stick’s shadow with another rock.
Put your left foot near the first rock, your right near the second. Now you’re facing north.
Using the stars: This takes a little more work, depending on visibility and your location. In the Northern Hemisphere, there’s two ways to find the North Star (Polaris).
Big Dipper method: First, find the bugger. Then using the two stars forming the side of the ladle away from the handle, mentally draw a straight line until you hit a super bright star. That’s Polaris.
Little Dipper method: Polaris is the final star in the Little Dipper’s handle. Super easy to navigate by, if you can find it.
There you have it, a few tips to prevent you from getting lost in your quest to find food and water while on the run from zombies.


 We’ve covered food quite a bit. Understandably. While a human can survive for three weeks without food, it isn’t pleasant. Starvation means no fuel to make our bodies move, and we’re all about mobility here at the ZSC. Staying put, unable to defend yourself is the very thing we’ve been preparing our brigadiers against. A stationary target becomes zombie chow pretty quick. But how are we supposed to maintain a balanced diet on the run? You won’t. However, if you focus on finding steady sources for protein, keeping one step ahead of the undead will be much easier.