As part of our collective efforts to prepare for the z-poc, ZSC command has undertaken a mission to bring you a series of recipes to keep the body strong and the spirit lifted during dark times. This recipe from Red Brigade Sergeant at Arms Amy Sundberg works great in the Green brigade’s zone, the Southeastern United States, where it shouldn’t be too hard to find a chicken or two…
Coffee Can Chicken
Yep, you read it right. Not canned chicken, although that’s not an unreasonable item to add to your food supply list… but this recipe is the tried-and true real deal. Slow cooking techniques, while they are certainly slow, are key to bringing out the natural flavor of just about any kind of meat. Little preparation is required, and the necessary ingredients are few. If you want a quick meal, this isn’t it. But if you have the time to sit down for a spell or you have other things you can do in the meantime, this one is worth trying.
You will need:
1 whole chicken, butchered and plucked (no more than 3 1/2 lbs)
Butter (margarine or oil will work)
Salt & Pepper
Heavy duty aluminum foil
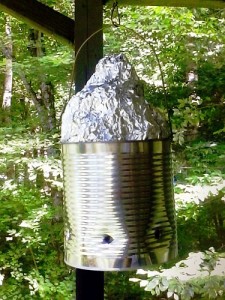
Gallon-sized tin can
Charcoal briquettes
Optional: Veggies of choice, such as onions, carrots or garlic for more flavor. Go light on the extras, as more materials will extend the cooking time considerably.
Note: During cooking, the can WILL get hot enough to burn whatever is below it, so be very careful about choosing where to put it. If you have inquisitive young ones around, we recommend hanging it from a low branch in a safe place, away from flammable materials and grabby fingers.
Preparation:
Punch or drill holes in the tin can 1 inch up from the bottom approximately 1 inch apart all the way around the can. Place 18 briquettes (no more no less) in the bottom of the can and light.
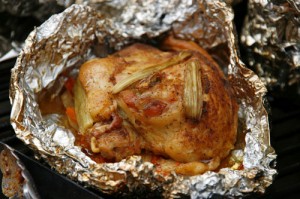
Rub chicken with butter and season as you like. Wrap chicken with heavy aluminum foil twice, side to side and then from bottom to top. Make sure the foil closing point is on the top of the chicken.
Once the charcoal has turned white, place the foil-wrapped chicken into the can with the legs facing the top. It’s perfectly fine if the chicken sticks out of the can. Let the can and chicken sit (or hang) for 3 hours.
After 3 hours, remove the chicken from the can. Take care opening the foil, steam burns hurt like heck. If the chicken is falling off the bone tender, juicy and smelling delicious, it’s done.
Once again the Zombie Survival Crew commanders are teaming together to bring you, loyal brigadiers, easy and delicious recipes you can fix on the run during the zombie apocalypse. The goal is to find a mix of food ideas that’ll keep you ready to fight your way to safety, even when supplies are running low.
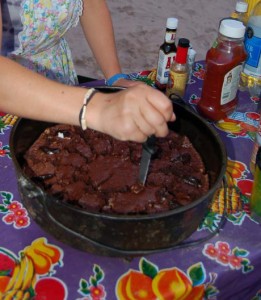
This week we’re making Food. Yes, that’s what it is called, Food. In the Orange Brigade kitchen, Food refers to a single-pan dish with everything you find in the pantry that’ll taste good together. Typically, Food consists of potatoes, some sort of sturdy green vegetable, onions, and meat or cheese for a protein kick. Here’s the basics.
What You Need:
1 large cast iron skillet
Spatula
1 tablespoon oil (Any kind. Butter will also work. You just need to keep the potatoes from sticking.)
1 pound potatoes, washed and chopped into bite-size pieces
1 medium-sized onion, chopped
Garlic (fresh or powder), to taste
Salt and pepper, to taste
Whatever other vegetables you have on hand – Corn, bell peppers, asparagus, leeks, cabbage, broccoli, etc. Chopped in bite-size pieces.
Whatever meat is available – sausage, chicken, deer, rabbit, squirrel, etc. (No fish. It is too delicate to handle the cooking process.) Chop meat in bite-sized pieces.
Cheese (optional)
How Do You Cook Food?
Heat the cast iron pan over the fire, add oil.
When the oil ripples, carefully toss in the potatoes and onions. Cook until the onions start to turn clear.
Add in the meat. Cook until the outside edges of the meat are done.
Add in the garlic and other vegetables. Cook, stirring to keep the potatoes from sticking, until vegetables are tender and the meat is cooked through.
Toss cheese on top and serve in a bowl.
It isn’t a glamorous meal. Heck, it doesn’t look particularly thrilling, either. But it is a great, easy way to get your vegetables and protein in. One pan will feed at least five people.
Heads up! We’ve got a tasty treat for you today for Lt. Blue Brigade, with some down home cooking from Iowa! In other words….DESSERT!
Grandma Corabelle’s Fudge Brownies
1 cup butter
12 heaping tbsp unsweetened cocoa
2 cup sugar
1 tbsp vanilla
4 large fresh eggs
1 1/2 cup flour
1/2 tsp salt
1 cup chopped nuts, if ya like
Mix together butter and cocoa in dutch oven (or saucepan) and heat slowly till the butter is melted. Let it cool till it’s lukewarm. Beat in sugar and vanilla. Beat the eggs in, one at a time. Stir in flour and salt just till it’s mixed, and fold in nuts.
Bake in dutch oven with low fire/coals for about 25 minutes, and the top has lost its shine. Use a knife to scrape the sides for easier removal, or just scoop it out into bowls!
Thanks to fellow ZSC member Beth of Orange Brigade for offering up this wonderful family recipe!
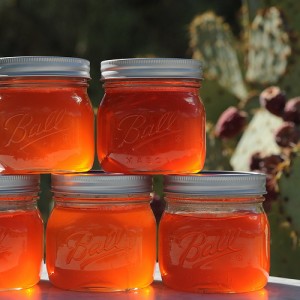
You’ll need a pot to cook over a fire, tongs, gloves, a bowl and an instrument to mash like a potato masher.
Pick fruit with gloves and tongs. You don’t want to prick yourself with those needles! There’s a reason it’s called Prickly Pear.
While holding the fruit under running water with the tongs, brush off the needles with a wire brush. Yes, a wire brush.
Place them in a pot. Cover with water and boil until tender (about 1 hour). Cut them in half after cooking, as they will mash easier. Drain and mash with a potato masher. Strain with double thickness cheesecloth (juice should be clear, no needles, etc.). Put pulp in garbage, not disposal (if indoors).
Measure 2 cups prickly pear juice with 1 ¾ oz. pkg. pectin, assuming you’ve got some with you. If not, raid a local grocery store because let’s face it, no one’s going to be yanking pectin off the shelves during an apocalypse. Bring to boil, stirring constantly.
Add 3 ½ cups sugar and 3 Tbsp. lemon juice. Boil—rolling boil—for 3 minutes . . . stir constantly.
Remove from heat and skim off foam.
Pour into glass jars and seal.
Mmm mmm good! Now you have jelly to go with whatever your apocalypse breakfast will be!
You’re welcome.
Jinxie G
PS: Jinxie would like to thank her wonderful Aunt Pat for this recipe! =)
As part of our collective efforts to prepare for the z-poc ZSC command is continuing its mission to bring you a series of recipes to keep the body strong and the spirit lifted during dark times.
The last time Blue Brigade was in the frying pan to provide a recipe, they went with one of Commander Reedus’ personal favorite dishes, macaroni and cheese. This time Blue Brigade is going true ‘squirrel-slinging redneck style’ –and if anyone can come up with a nifty little tune to accompany this there could be a prize involved.
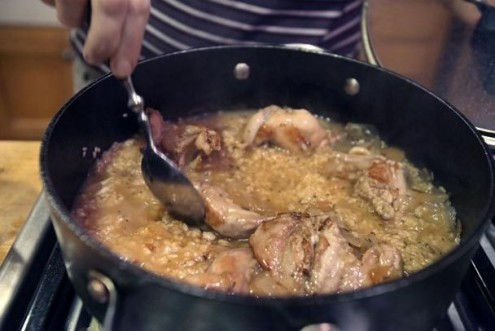
All jokes aside this is a handy, easy recipe for a hearty meal on the go that can be tailored to reflect individual tastes and the environment you’re in when the time comes to make this stew.
Ingredients:
1 squirrel, butchered, skinned and cut up
flour salt and pepper, to taste
2 1/2 tablespoons butter
7 cups water 1 teaspoon thyme
1 cup corn
3 potatoes, cubed
1/4 teaspoon cayenne
3 medium onions, sliced
2 cups canned tomatoes with juice (or a bushel of fresh tomatoes, cut up)
Directions:
1 – Roll the squirrel pieces in flour, salt, and pepper.
2 – Brown in butter. Remove from pot.
3 – Add water to pot and bring to a boil.
4 – Add squirrel and all other ingredients (with the exception of the tomatoes) to the boiling water, cover, and simmer for 1-1/2 to 2 hours.
4 – Add the tomatoes and continue to simmer another hour.
In the last few months we’ve brought you recipes for z-poc ready dishes including blackberry jam, dried meat and squash soup. Which recipes you’ll be able to use will depend in a large part of where you find yourself in the midst of the infection and how easily you can get to fresh ingredients.
And if you find yourself near a lake, stream, ocean or river, fish should be in plentiful supply. So here’s a quick, easy, and ever-alterable, recipe from the Red Brigade that will work with virtually any fish you can catch and can be tailored to fit your immediate environment, available ingredients and personal tastes.
You’ll need an 12″ square piece of tinfoil (heavy duty if you have it) and butter or some oil. Add enough butter or oil to keep the fish from sticking to the foil. Take your fish fillet or whole, cleaned fish and put in the middle of the foil. (In case you missed it, Lt. Blue Brigade provided a quickie lesson in cleaning fish)
Add choice of sliced vegetables, garlic, lemon juice, spices or other items for flavor. Whatever you can find in you Go Bag or surrounding environment, it’s hard to go wrong here.
Fold the tinfoil to contain the heat and juices…this is important. A loosely folded or crumbled tinfoil ball will take longer to cook and a lot of flavoring and moisture will escape through the cracks and holes.
Place the foil in the hot campfire coals. For small fillets bake on each side for approximately 3 minutes. Larger fillets can take as long as 10 minutes per side.
Allow to cool a few minutes before eating. Open the packet carefully, there will be hot steam.
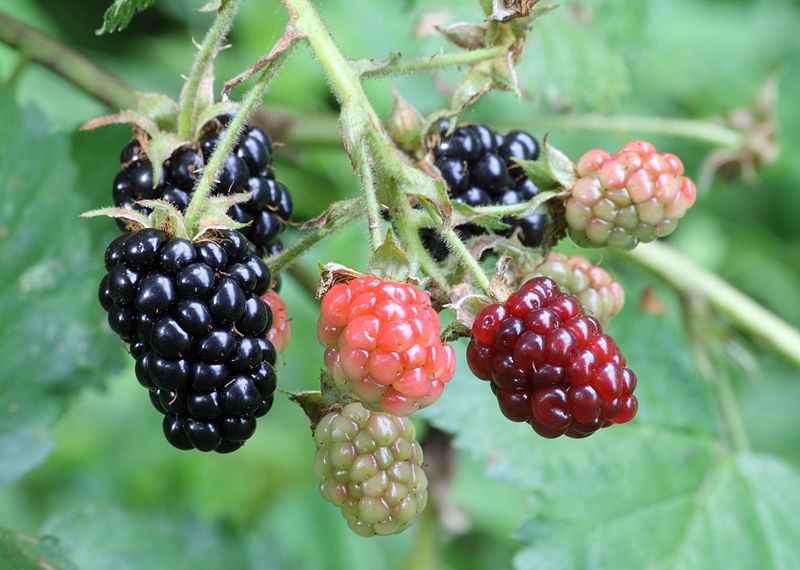
You’ve been hiking through the wooded areas of the Pacific Northwest, keeping an eye peeled for zombie activity. Things have been a bit quiet — which is good, you’re not complaining … when BAM! Out of nowhere, your sweet tooth kicks in and it’s running on overdrive. You eye your fellow travelers and wonder whether sweetbreads really are sweet. After doing a quick check to make sure you haven’t been bitten without realizing it, you notice some bushes in the distance.
Boo-yah!!! You’ve hit the jackpot. Wild blackberries for everyone. All you have to do is pick them. Then the monster idea hits… Blackberry Cobbler. A desert for kings served up camp-style for you and your fellow Zombie Survival Crew members.
Grab whatever you can find to hold the berries and dance your way to the berry patch.
Post a sentry to make sure no wandering zombies, or hungry bears try to fight you for the berries.
Do NOT walk through the patch of nettles. Or at least make sure you’re wearing boots and the thickest pair of socks you have with you.
Pick as many berries as you can carry. While some will go in the cobbler, the berries are great to eat on the go, and have plenty of antioxidants and all sorts of other good things for you.
When you get back to camp, melt a stick of butter (or margarine) over the fire.
Mix together 1 cup of self-raising flour, 1 cup of sugar, and 1 cup of milk.
Pretend it is zombie brains and beat well.
Pour the melted butter into a 2-quart-ish pan (if you didn’t melt it in the pan to begin with)
Pour the floury, sugary goodness over the butter — BUT DO NOT STIR.
Add berries (about a quart to the mixture). DO NOT STIR
Keep on the fire until the crust rises over the berries and turns golden brown.
Try not to drool while waiting.
Serve hot with a little cream, or for a real treat, a scoop of ice cream … if you can find any.
This tasty treat is a favorite of the Purple Brigade leader and has the Oracle stamp of approval. Oh, and if you have an oven available, preheat to 350F.
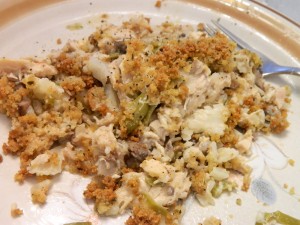
In our ongoing effort to keep the masses well fed and happy during the z-pocalypse, we’re taking a page from Green Brigade Commander IronE Singleton’s book. Not literally, of course… but it’s been suggested from time to time that the Commander has more than a few skills in the kitchen. We’ve come up with a quick and easy version of a traditional recipe that any Southern grandma would be proud to share. At least we hope so.
This quickie casserole can be made with fresh or frozen ingredients, in a traditional oven or even a Dutch oven over a campfire if the situation calls for it. Using frozen meat and veggies from your pre-apocalypse stockpile yields wholesome results in almost no time at all!
1 (10 3/4-oz.) can cream of chicken soup with herbs
1 (8-oz.) container sour cream
1 (8-oz.) can diced water chestnuts, drained
Optional: 3/4 cup sliced almonds, salt & pepper to taste
Preparation
Preheat oven to 400°. Melt butter over medium heat, add onions and sauteé 6 to 8 minutes or until tender.
Stir all other ingredients and add onions. Spoon mixture into a lightly greased 13- x 9-inch baking dish or dutch oven, add salt & pepper, sprinkle almonds on top.
Bake at 400° for 30 to 35 minutes or until bubbly and almonds are lightly browned. Let stand 10 minutes.
Don’t like almonds? Sprinkle shredded cheese instead. Or try bread crumbs, crushed crackers or even crush pretzels or potato chips on top if it’s a little crunch you want. There’s plenty to share. Enjoy!
Sure, the Zombiepocalypse has started. Supplies are running low. However, if you’re like me, you’ll find a way to feed yourself and those around you with just a few simple ingredients.
This recipe can be altered to cook over a fire. Note: if you are not using bottled water to cook with, boil the water necessary (plus extra for evaporation) before adding any ingredients.
Prep time: However long it takes Cook time: See above Servings: 6-8
What you need:
Large pot
Spoon
Knife
Blender (hand blender or potato masher)
Ingredients:
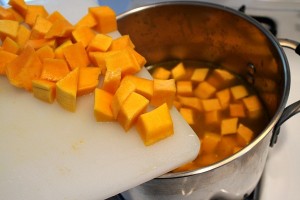
1 large butternut squash – peeled, gutted, and chopped into inch-size chunks
1 medium-sized onion – rough chop
2 cloves garlic – minced
1 tbsp olive oil
½ tsp thyme
2 tsp yellow curry powder
1 tsp brown sugar
4 cups water (use chicken broth or vegetable broth for extra flavor)
Salt and pepper – to taste
1 cup milk (any milk you have, even non-dairy like coconut milk)
How you make it:
Heat the olive oil in large pot over medium heat and add onions. Sautee until the onions begin to turn translucent.
Add the garlic. Sautee for another minute.
Add the squash, thyme, curry powder, and brown sugar.
Cook until the squash begins to turn soft, stirring occasionally.
Add the water (or your liquid of choice) and bring to a boil.
Allow the soup to simmer until the squash is soft enough to squish with the back of your spoon.
Take the pot off the heat. If you use a hand blender or potato masher, squish the squash until everything is smooth. (Note: with the potato masher, the onions will remain whole).
If you use a regular blender, pour a portion of the sup mixture into the blender. Remove the plastic vent-thingy on the lid and cover the hole with a paper towel before blending. Otherwise the heat will build up and you’ll end up wearing dinner. Continue blending batches of the soup until it is all done and return to the pot.
Add the milk. Use enough to thin the soup without making it watery.
Season with salt and pepper until you like how it tastes.
May be garnished with sour cream when served.
If you prefer spicy soups, add a dash of cayenne pepper with the water before boiling. Careful, a little goes a long way.
Being stuck in a world infected by the undead doesn’t mean you have to eat boring foods. Sneak some favorite spices into your go bag on your way to your nearest escape route and fight dull taste buds along with zombies.
Surely cooking a tasty meal isn’t going to be high on your list of priorities during the early onset, but once you’ve made your way to (relative) safety and your stomach wants more than energy bars and water, it’s time to think about what to do next.
The most obvious first step is to consider your surroundings. Did you escape the city and make a run for the hills? Mountains? Woods? Is there an easily accessible water source? River, stream or lake? Wherever you are, as long as it’s safe to build a small fire and you’ve got the skills to manage it, you’re already one step closer to dinner. This week’s recipe is for those who had the foresight to include fishing gear and aluminum foil in their Go Bags. Even if you lost your gear during the mad dash through the shambling horde, all is not lost. A bit of creative resourcefulness can help anyone can hook a fish or two.
The biggest drawback – fish is very perishable. You can’t take it with you. Without proper refrigeration, your catch of the day will spoil very quickly. If you can, keep it alive in a bucket of water or other container until you’re ready to clean it. Fish is healthy, easy to cook and might just be the best damned thing you’ve ever eaten if you’ve been living on energy bars long enough. You can wrap your catch in leaves and steam it, roast it on a stick or, if you happened to remember to pack aluminum foil and a few choices spices, keep this traditional campfire foil cooking recipe in mind.
Campfire Trout in Foil
Ingredients:
1 large square of aluminum foil (about 24-by-24 inches)
Salt, pepper, any favorite seasonings or wild herbs (Some plants are toxic. Don’t eat it if you don’t know what it is)
2 lemon slices (you can also use apple slices, grapes, wild blackberries or huckleberries)
Butter or a bit of cooking oil
Small trout
Directions:
Clean the fish thoroughly. Good cleaning helps prevent spoilage and the spread of any bacteria. Just chop off the head with a large, sharp knife and gut the fish. Remove the entrails and rinse it out to remove any blood, bacteria, parasites and enzymes. Don’t be squeamish. You’ve just hacked and slashed your way through a zombie hoard, haven’t you? This should be the easy part. Small trout are easy to clean. If there are larger fish available and you’re able to hook one, this part will be a little messier.
Place the aluminum foil on a flat surface and put the trout on top. Sprinkle the fish, inside and out with salt, pepper and seasonings. Put lemon slices on top and a couple pats of butter. Wrap tightly, making sure that the foil is at an even thickness all the way around. Place your foil pack directly onto the coals of a campfire. Cook about 5 to 8 minutes on one side, and then turn. The fish is done when the flesh is opaque and flakes easily.
Simple, right? What? No aluminum foil? Well, that’s all right. Season it and put it on a stick. Find a stick that’s forked and sharpen the prongs a bit with your knife. Insert the prongs of the fork on either side of the backbone. Make sure it’s sturdy or it will end up in the coals. When the fire has burned down to red coals, simply hold the stick so that the fish is about 6 inches from the coals and grill it about 5-10 minutes per side. When it’s flaky, it’s done.

 Punch or drill holes in the tin can 1 inch up from the bottom approximately 1 inch apart all the way around the can. Place 18 briquettes (no more no less) in the bottom of the can and light.
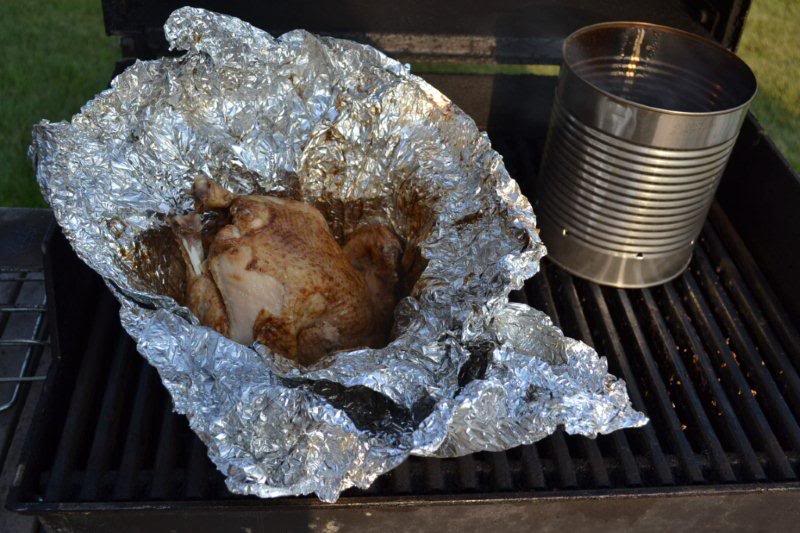


 Pick fruit with gloves and tongs. You don’t want to prick yourself with those needles! There’s a reason it’s called Prickly Pear.
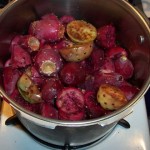 Place them in a pot. Cover with water and boil until tender (about 1 hour). Cut them in half after cooking, as they will mash easier. Drain and mash with a potato masher. Strain with double thickness cheesecloth (juice should be clear, no needles, etc.). Put pulp in garbage, not disposal (if indoors).